Solving Carryover Problems in HPLC
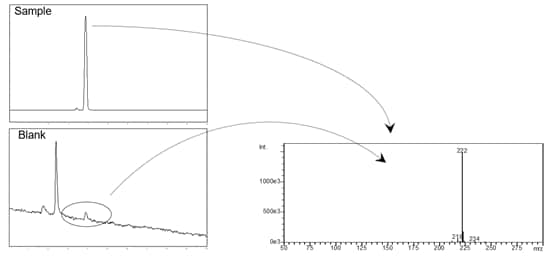
Carryover is recognized as the presence of a small analyte peak that appears when a blank is injected following the injection of a sample that produces a large peak of the same analyte. When it occurs, peaks attributed to the previously analyzed sample may be observed in the subsequent chromatogram(s) which may co-elute or interfere with desired analytes. Shown below, the mass spectrum of a blank reveals the profile of a target analyte. It is one the most frustrating problems in HPLC.
Carryover usually amounts to a chemistry problem when coupled with certain sample injection flow path materials and hardware connections. What steps can we take to solve it?
Action Steps Overview
Take Action
1. Classify the carryover
a. Classic or Constant
i. Classic Carryover – The observation is a regular reduction of carryover peak size as blanks are injected consecutively. For example, the first blank might have a peak that is 1% of the size of the original, and then the next drops by another factor of 100. This carryover is often caused by a mechanical area in the flow path (like the intersection between two surfaces in a valve head where tubing is inserted and the nut is swaged). Hold-up of some sample is progressively diluted upon injecting blanks, causing progressively less carryover with each blank run.
ii. Constant carryover – Not true carryover. A small peak is always present with all samples and blanks and does not diminish with each blank run. This is caused by some source of contamination. If the contaminant peak seems to increase or decrease with increasing and decreasing blank injection volumes, it is likely that the blank is contaminated. If not, the source of contamination is elsewhere in the system.
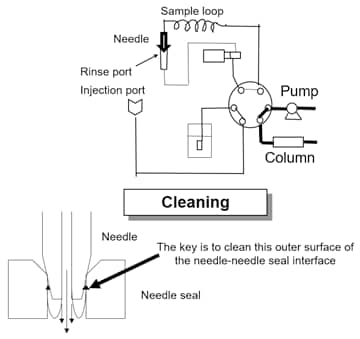
iii. Consider the importance of a ‘null-injection’ run. Shimadzu autosamplers offer the unique ability to perform a null-injection, which starts the chromatography run without injecting sample and without rotating the injection valve or high pressure valve of the autosampler. This simple test can help to determine whether the source of the problem is the injection event itself. A null run that produces no offending peak must indicate that the auto-sampler injection event is the source of the issue. It does not prove the source of the carryover within the autosampler, but it does narrow the problem down to the high pressure valve (HPV), its connections, and the outlet tubing connected to the column. Because Shimadzu autosamplers are needle-in-flow path design, this experiment rules out the sample loop and needle because eluent is always flowing through the loop and needle unless the valve is rotating or sample is being aspirated from a vial.
2. Replace the blank and vary the injection volume
a. It is important to rule out whether the blank itself may be contaminated. The easy way to check this is to prepare a fresh blank using a different matrix source (i.e. the solvent itself may be contaminated). In addition, varying the injection volume can be helpful –if you increase the injection volume of the blank and the peak area of the carryover peak increases as well, it is a strong indicator that the blank is contaminated. If you notice the size of the carryover peak remains constant, then most likely the carryover is located on the outside of the needle (see instructions for external autosampler rinsing). If you notice the size of the carryover peak decreasing with each subsequent injection then most likely the carryover is located inside of the needle and/or sample loop (see instructions for internal autosampler rinsing).
3. Rule out the chromatography column
a. The chromatography column may be the source of carryover, especially if it is fouling over time. The repeated injection of samples containing intractable materials or strongly retained constituents will slowly modify the characteristics of the column bonded phase with each injection. Gradient conditions may not effectively clean the column of such materials and the problem may worsen over time. The simple test for a problem column is to remove it from the system and replace it with a zero-dead-volume union. Do a sample run as normal, noting that there is no column to retain and differentiate sample constituents. Follow it with a blank run or two. Does carryover persist? If so, the problem is hardware related. If not, the problem lies with the chromatography column and you should replace it.
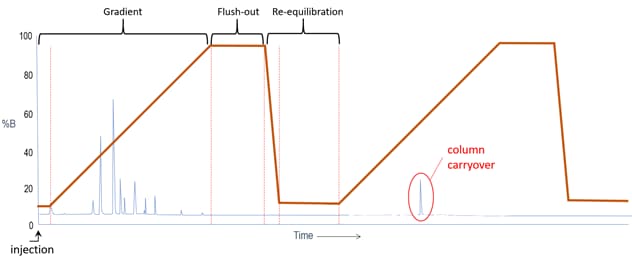
b. Another experiment can indicate whether the column is producing the carryover. Create a method that takes the pumps through a double gradient, as pictured below. The run begins with a sample injection. The gradient program moves from a low strength eluent condition to a high strength eluent condition, flushes the column at high strength, then returns to initial conditions for a couple of minutes. The same gradient is then repeated, but without a new injection occurring. In this way, the column bed is taken through a gradient of solvent strength to see if a carryover peak is again produced. If it is, it may indicate that the column packed bed or inlet frit are the source of carryover and a more aggressive and frequent column flush may be in order.
4. Check flow path fittings
a. This procedure generally is limited to the fittings on the HPV and all fittings downstream to the detector. Stainless steel fittings rarely are a problem, but PEEK fittings and tubing can slip under high pressures; for example, greater than approximately 4000 psi. You can check stainless steel fittings by slightly tightening them with a wrench. The best approach for PEEK fittings and tubing is to shut off the pump, loosen each fitting, push the tubing firmly to the bottom of the tube port, and re-tighten the fitting.
5. Check autosampler rinse phase solvent(s)
a. Purge the autosampler
i. This is a precautionary step to ensure all of the rinse lines leading supplying the autosampler are metering rinse solvent and not charged with air. It is possible that proper needle or seal rinsing is not occurring due to air in the lines.
ii. Use fresh rinse solvent - Replace the rinse phase solvents with a fresh batch and replace the rinse phase reservoirs with clean ones. After the rinse solvent is replaced, cycle the autosampler through the purge or rinse cycle several times to ensure that all traces of the previous rinse phase solvents have been removed.
b. Adjust rinse phase strength
i. A strong rinse phase is one that has an affinity for the sample constituents causing the carryover. For reversed phase chromatography where the organic solvent is the stronger, use more of it in the rinse mixture to ensure effective rinsing. Often it is effective to make the rinse phase chemistry roughly equivalent in strength to the mobile phase. Sometimes it is worth considering the use of 100% of the strong solvent (usually acetonitrile or ethanol). Isopropanol makes an excellent wash solvent for many applications (e.g. fatty acids) and proves to be more effective for removing contaminants than methanol or acetonitrile.
c. Adjust rinse pH
i. Consider that rinse phase pH is a form of chemistry ‘strength’. In some cases, analytes causing carryover may be quite sensitive to the pH of the rinse phase. For rinse mixtures, avoid using pH buffers or salts that leave a residue when evaporated. Never use phosphate buffers. Use volatile pH modifiers as one would use for LCMS mobile phases, like formic acid, acetic acid, ammonium formate, ammonium acetate, or ammonium hydroxide. Typically a 0.1–1% solution by volume is sufficient. Try adding acid or base to the wash solvent to see if the carryover is improved.
6. Enable autosampler rinse mechanism
a. Enable pre- and post-injection needle rinse. See the section at the end of this document for specific information about rinse types and rationale for use. Multi-rinse options allow for a combination of strong/weak rinse chemistries to be used for both external needle surface rinse and internal injection mechanism rinse.
7. Change hardware
a. Change needle, needle seal, injection loop, or HPV rotor
i. If you’re still trying to solve the carryover problem, it is highly likely that the problem is related to the autosampler hardware. At this point, you should substitute parts until you locate the problem. Often the easiest first step is to try a manual injection valve or to replace the autosampler with one that has not been exposed to the compound of interest. If either of these approaches correct the problem, it confirms that the problem is in the autosampler and further troubleshooting efforts along this line are worthwhile. If you haven’t done it already, replace the needle seal on the autosampler HPV, it is the culprit in many instances. If that is not effective, consider replacing the needle and sample loop.
ii. Sometimes the sample adsorbs on the sample loop because of the characteristics of sample and injection solvent. Replacing the loop with one of different composition can help solve this problem. Injection loops are available in stainless steel and PEEK. A combination of a new loop material and a different injection solvent should eliminate sample adsorption on the loop.
iii. The internal components of the HPV will become worn over time as a normal consequence of doing business. A worn rotor can be the source of carryover, but it is also usually associated with impairing the quality of chromatography peaks. Consider repairing or replacing the HPV.
8. Addressing sample-specific Carryover
a. By now you’ve tried all the easy fixes to carryover problems, so it is worth the trouble to see if the problem is specific to your sample. Sometimes you can check by examining another peak in the sample. For example, if your method uses an internal standard, try injecting a large amount of internal standard and then injecting blanks without an internal standard. Perhaps you can inject another chemically related compound that will be eluted under the current method conditions. If all else fails, you can change the mobile phase or column and run another method. If you find that the carryover problem is common to different compounds or method conditions, it is most likely a physical problem associated with the autosampler hardware or system flow path.
Reducing Carryover Using Autosampler Rinsing
As an overall rationale for addressing carryover with autosampler rinsing, use external rinsing first as it is quick and easy. If a more aggressive approach is desired, try adding internal rinsing.
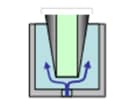
External Rinse with Shimadzu Autosamplers
This cleans the outer surface of the needle by immersing it and/or actively rinsing it in a rinse port before or after the sample is drawn. There are two rinse ports (immersion and flow). In simplest terms, the immersion rinse port allows you to dip the needle into a rinse solvent (R0). Commonly, R0 is mobile phase or something chemically stronger. A multi-rinse option (equipped as standard on the SIL-40C X3) allows you to use an active flow rinse port to clean the outer surface of the needle with a different combination of rinse solvents (R1 and R2). The R1 and R2 could set up a rinsing sequence of strong solvent (R1) followed by a weaker solvent (R2). The multi-rinse option may also use an active rinse solvent (R3), which controls cleaning with an active diaphragm pump.
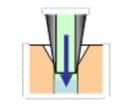
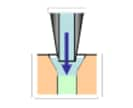
Internal Rinse with Shimadzu Autosamplers
This function can rinse the inner surface of the needle and sample loop, and the injection port. Use of the multi-rinse kit enables rinse with up to 3 types of solution (R0, R1, and R2). The strong/weak rationale should be used when setting choosing the chemistry of the rinse phase solvents. The following table summarizes available rinse options.
Rinse Operation
The following table summarizes rinse operation for each type of rinse.
| (Rinse Type) Set Value |
Needle Outer Surface Rinse | Needle Inner Surface Rinse | ||
|---|---|---|---|---|
| Immersion Rinse | Pump Rinse (optional) | Needle Inner Surface Rinse | Injection Port Rinse | |
| - |  |
 |
 |
 |
| 0 No needle rinse |
- | - | - | - |
| 1 Needle outer surface rinse |
One Solution *1 | (R3 only) | - | - |
| 2 Needle innner and outer surface rinse |
One Solution *1 | R3 Only | Three solutions max *2 | Three solutions max *2 |
| 3 Fast operation |
- | - | - | - |
*1 Only the rinse solution R0 is available without a multi-rinse option. With a multi-rinse option, selection one solution from R0, R1, or R2.
*2 Only one rinse solution (R0) is available without a multi-rinse option. With a multi-rinse option, three rinse solutions (R0, R1, and R2) are available. It is recommended to use the mobile phase for the rinse solution R0.
